Tuesday, 11 April 2017

to use a visualizer/document camera to display and share the information to the whole class


Visualisers are becoming increasingly common in classrooms. These tools are like a webcam which is permanently connected to your whiteboard / projector and lets you show things to the whole class using the large screen display in your room.
Here are some ideas for using a visualiser in the classroom:
  • Demonstrate a close-up technique which would otherwise be difficult to show to the whole class:
    • Using a ruler accurately,
    • Using a protractor to measure angles accurately,
    • Demonstrating an art technique.
  • Sharing children’s work with the whole class. This lets everyone see their work in lots of detail and gives the child a chance to have their work displayed to all.
  • Showing objects and artefacts in close detail.
  • Reviewing / evaluating other children’s work... put an example of a child’s work under the visualiser and ask the other children to comment on it... which parts are strengths? Are there any areas which could be improved? Are there any details which are missing?
  • When reading a story to the children, use the visualiser to show them the pictures - turn a regular book into a very big book!

videos on 3 different types of teaching styles


how to use interactive whiteboard in the classroom


Interactive Whiteboards Enhance Classroom Instruction and Learning

Although the first interactive whiteboard was released in 1991, only in the last several years have whiteboards become a must-have tool in K-12 classrooms. New emphasis on developing 21st century skills for students, the requirement for educator proficiency in technology, and research documenting increased learning with the use of interactive whiteboards have spurred its adoption.
Fundamentally, an interactive whiteboard combines a dry erase whiteboard with an LCD projector and is usually mounted on a wall or floor stand. Powered by easy-to-use software, the whiteboard becomes a computer screen viewable by an entire classroom. The projector projects the content from a computer onto the surface of the board while the teacher controls the content either with a pointer or a touch of the hand instead of a keyboard and mouse. The combination of software with the projector results in much more than simply a projected image.
Anything that can be done on a computer monitor, can be replicated on the interactive white board. A teacher can create engaging lessons that focus on one task such as a matching activity where students use either their fingers or a pen to match items. Another teacher might integrate multiple items into a lesson plan such as websites, photos, and music that students can interact with, respond to verbally or even write comments on the board itself. Image size and placement can change with a simple touch to the screen. This technology makes the one-computer classroom a workable instructional model. Imagine taking a class on a photo safari to Africa complete with embedded videos, animal sounds and mapping software.
Research has repeatedly demonstrated that students learn better when they are fully engaged and that multisensory, hands-on learning is the best way to engage them. Interactive whiteboards facilitate multisensory learning whether it is a collaboration exercise for math problem solving or a Google Earth tour of the Amazon rainforest.
In September 2008, Newsweek magazine reported that more than 70% of primary and secondary schools in the U.K. have interactive whiteboards compared to only 16% in the U.S. Not surprisingly, the majority of the research findings originate in the U.K., although recent U.S. studies report increased student engagement, school attendance, and higher test scores. Judging from recent news reports, it is likely that a portion of the new federal education stimulus funding will be invested in interactive whiteboards.
Classroom applications for using interactive whiteboards include:
  • Multimedia lessons and presentations including audio and video
  • Collaborative problem solving
  • Showcasing student projects and presentations
  • Virtual field trips
  • Recorded lessons that can be used by substitute teachers
  • Documentation of student achievement
There are now many interactive whiteboard companies to choose from, and most feature video, image, and lesson libraries. Here are some of the leading brands:
  • SMART introduced the first interactive whiteboard in 1991 and it is the world’s best-selling interactive whiteboard. A leader in introducing touch technology into the classroom, SMART boards allow teachers to access 6,600 learning objects and customizable lesson plans.http://smarttech.com/
  • Promethean now offers an integrated system that packages the interactive white board, Learner Response System, lesson design and delivery software and online support and professional development.http://www.prometheanworld.com/
  • Mimio is a system that creates an interactive whiteboard out of a standard whiteboard. For districts that are trying to manage tight budgets and already own whiteboards, Mimio is a good option. It also includes online training and certification. http://www.mimio.dymo.com
  • Numonics features electromagnetic technology and a multimedia pen to utilize a full range of cross-curricular activities and training. Their website, http://www.interactivewhiteboards.com/,  offers the following research statistics:
    • A study by the University of Wisconsin confirmed that using visual aids improved learning up to 200%.
    • Harvard and Columbia Universities found that student retention is improved up to 38%.
    • Wharton School of Business proved that the time to explain complex subjects is reduced by 25% to 40%.
  • eInstruction’s newest product offering, Interwrite Workspace, includes more than 4,000 digital, K-20 teaching resources from math to language arts and science. Publisher-independent, Interwrite Workspace includes 50 tools to create, display, organize, record and share teaching materials. 
  • Polyvision’s eno board can be used as a traditional marker board, a magnetic board, or an interactive white board with no plugs or cables. It promises the lowest total cost of ownership for schools and districts looking for the most affordable interactivity. 
NEA member Chad Lehman of Horace Mann Elementary School in West Allis, Wisconsin, has seen a marked increase in student attentiveness and engagement since his district began integrating interactive white boards into elementary classrooms. As his school’s media specialist and technology coordinator, Lehman reviewed the district’s technology plan which recommended both SMART and Mimio. Although SMART had a much larger user community, he chose Mimio because it was more affordable and portable whereas SMART boards are mounted on walls.
“The down side to choosing Mimio is that they have fewer software and lesson resources,” Lehman stated. “Our district has invested heavily in computers, video equipment and LCD projectors, so Mimio is very popular.” He went on to say that the district technology goal is to have an interactive whiteboard in every classroom, but finding the money could be a problem.  Lehman did not know if his district would receive any new federal stimulus funds, but said it was not likely that they would be used to buy interactive whiteboards. “This kind of technology helps us teach students 21st century skills, and I’m confident we’ll continue to fund our implementation and training on this.”
There are interactive whiteboards that meet every school and district budget. Teachers report that increased student engagement is the number one benefit to teaching with this tool. The technology allows teachers to integrate multiple information streams into a coherent lesson individualized for their students. Interactive white boards provide an extraordinary opportunity to create classroom environments where students with different learning styles can engage and learn from each other. This easy-to-learn technology ensures that both students and teachers are developing 21st century skills.

Thursday, 9 February 2017

How to create a blog

How to Start a Blog on Blogger

This wikiHow teaches you how to create a blog on Google's popular, easy-to-use blogging platform.

Method One of Two:
Creating a Blog

1

Go to Blogger.

2

Click on Sign In. It's in the upper right corner of the window. Enter your Google username and password.If you don't have a Google Account, click on Create Your Blog.

Select a profile type. Click on Create a Google+ profile to create a single account to use across all Google properties. If you'd like to use a pseudonym or limit your exposure on Google, click on Create a limited Blogger profile.Follow the online prompts to finish creating your profile.

3

Enter a Display Name and clickContinue to Blogger. The display name is the name that your readers will know you by.

4

Click on Create New Blog.

5

Type a title for your blog.

6

Type a URL for your blog. If it's unavailable try other variations on the name you want to use, but don't use symbols like hyphens, underscores, colons.

7

Enter the word verification and clickContinue.

8

Choose a starter template. This is the basic design and layout of your blog.

9

Click on Create blog!.

10

Click on Template. It's near the bottom of the menu on the left side of the page. This allows you to customize the look of your blog beyond the elements contained in the starter template.

11

Select how to customize the design. Click on Customize if you'd like guided choices. Click on Edit HTML if you're a more advanced user.

12

Click on Settings. It's in the center of the menu on the left. From here, you can adjust other settings such as language, whether your blog will be included in search engine results, and whether you're willing to receive emails.

13

Click onPosts, comments and sharing. In this menu, you can adjust publishing, comments, and if or how your blog is shared beyond the Blogger platform.

14

Click on Basic and then+Add authors. The latter link is in the lower-right corner, under the "Permissions" section of the menu. This setting allows you to add other contributors to the blog, so that the writing burden does not rest on your shoulders, alone.

Wednesday, 8 February 2017

How to access internet

How to Fix Your Internet Connection

Method One of Two:
Desktops and Laptops

1

Determine if the problem lies with your computer or with the network.Can other devices on your network connect to the internet? If the answer is yes, then the problem is likely rooted in your computer's settings or hardware. If no other devices or computers can get online, then the problem is likely with your networking hardware or network configuration.

2

Restart your computer. This may seem like a useless suggestion, but restarting your computer is often the easiest way to fix a vast majority of the issues you may be having. A simple reset will clear out bad settings which could be causing your connectivity issues, and if it doesn't help, it only took a minute.

3

Try a different website or program.There's always a chance that the website you are trying to visit is currently down, or the program you are using is having server problems on its end. Try another website or online program to see if you can connect.Try another web browser if possible as well. For example, you may be having a problem with Chrome, but Firefox will work. If just one of your web browsers is at fault, see the articles below for instructions on repairing it

4

Reset your network hardware. If your internet connection was working fine and now it's not, the most likely culprit is your network hardware (modem and router). Resetting these devices is a quick and easy fix that will solve most networking problems.Unplug your modem and router's power cables.Wait about thirty seconds.Plug your modem back in and wait a minute for it to completely power on.Plug your router back in and wait a minute for it to power on and connect.Try loading a web page on your computer. If the problem persists, move on to the next step.

5

Ensure your wireless adapter is enabled (laptop only). Many laptops have a switch or button that turns the wireless adapter on and off. If you've accidentally pressed the button, your computer will disconnect from the network. Press the button or toggle the switch to turn your wireless adapter back on.You may have to hold the Fn button in order to be able to press the Wi-Fi button.

6

Repair your connection. There could be a software problem on your computer causing the connectivity problem. Both Windows and Mac have built-in repair tools that you can use to try to fix the issue.Windows - Open your Network Connection window by pressing⊞ Win+R and typing ncpa.cpl. Right-click on your network adapter and select "Diagnose". Windows will scan for problems. Follow the prompts to attempt to fix any problems that are found.Mac - Click the Apple menu and select "System Preferences". Select the "Network" option and then click "Assist me". Select "Diagnostics" from the list of options. Follow the prompts to run a diagnostic scan on your network and attempt to automatically fix issues.

7

Connect your computer directly to the modem (if possible). Each piece of networking hardware you add to your home network increases the chances that something can go wrong. The best way to test that your internet connection is working is to plug your computer directly into your modem via Ethernet cable, bypassing the router.If your computer is able to connect to the internet while connected directly to the modem, then the issue is likely cause by your router.If you cannot connect to the internet while connected directly to your modem, there is something wrong with the modem or with your internet service in general. You'll need to get in touch with your internet service provider's technical support line to fix modem-related issues.

8

Disable your network security (for now). When trying to troubleshoot a wireless network, network security can add unnecessary complications. Disabling the security while you're troubleshooting will make your life easier, and then you can secure your network again after fixing the problem.Make sure you don't leave your network unsecured for any longer than you spend fixing it.

9

Boost your Wi-Fi signal. If the problems you're experiencing are signal-related, it usually means that interference and distance are the main cause. There are several things you can do to help minimize interference and increase your network's range.

10

Reset your router's settings. A problem with your router's configuration may be causing your connection problems. You can reset your router by pressing and holding the "Reset" button on the back for about thirty seconds. You may need a pen or other pointy object to reach the button.Resetting your router will erase any changes you have made. If you've configured a custom network, all of your settings will need to be redone.

11

Perform virus and malware scans.Viruses and other malicious computer infections may be hindering your ability to get online. Viruses can be tricky to get rid of, but you're computer will be much more secure and stable once you do.

How to operate a laptop

How to Use Laptops

Laptop or notebook computers are increasingly powerful, portable alternatives to smart phones and desktop computers for getting serious work done on the go. If you're moving up to your first laptop or just sitting down at an unfamiliar one, things might seem a little odd at first. Fear not - follow these steps for getting started with all laptops and we'll get you up and running like a pro in no time.

1

If you are using the laptop in your home, find an outlet and plug the charger in. Laptop computers run on batteries that can deplete rapidly, especially if you're using your laptop intensively. Unless you're somewhere remote or foreign where you absolutely have to go without, it's better to leave your laptop plugged in.

2

Place the bottom part of the laptop on the table/desk you are sitting in front of. They're called "laptops" because they can go on your lap, but that doesn't mean that it's always the best or right place. Try to find a comfortable angle for your wrists and hands - this might mean moving the laptop around until you find the best position for you.Don't place your laptop on soft, fuzzy or shaggy surfaces that can block its vents. Most laptops have fan vents located on the sides and bottom that should be left unblocked for the laptop to run.

3

Lift the lid to open up until the screen looks comfortable for you. Most laptops have some type of clasp or latch which allows the screen to open.If the laptop won't open, don't try to force it! Look for a latch instead. You shouldn't have to force the screen open.Do not pull back the lid too far. A 45 degree obtuse angle is the most the laptop should be open to. The lid or hinge mechanism may be damaged or broken if pulled back any further.

4

Find the power button and turn it on.On most laptops, the power button is located slightly behind the keyboard. The power button is usually marked with the universal symbol for 'power on', a circle with a line going halfway through it.

5

Wait for the laptop to boot up. Since laptops are designed for portability as well as computing power, your laptop may have specialized hardware that will cause it to take longer to boot up than a desktop or smart phone.

6

Use the laptop's pointing device. On most computers, this is a flat, touch-sensitive area called a trackpad which will allow you to use your finger as your mouse. Simply slide one finger on the trackpad area to move the cursor.Many trackpads are multi-touch - using multiple fingers will produce different user interface actions than using just one. Experiment with your laptop by dragging one, two or three fingers across it and trying different 'gestures' or movements with your fingers.Lenovo laptops may use a small, red joystick-like button called a "trackpoint" located in the middle of the keyboard between the 'G' and 'H' keys. Use it just like a very sensitive joystick for just your finger.Some older laptops may have a trackball. Rolling the ball on a trackball will cause the mouse pointer to move around.Some laptops are equipped with a pen interface. A pen will be attached to the laptop in these cases. Hover the pen over the screen to move the pointer, and press the pen to the screen to click.Do you find laptop pointing devices tiny and difficult to use? You can always attach a mouse to a laptop. Locate the laptop's USB port and attach a mouse if you'd like to use one. The laptop will automatically recognize the mouse and make it ready for you to use.

7

Use the trackpad's left click button as your primary mouse button. On most trackpads, you can click using a button located on the bottom left of the trackpad.Some trackpads may allow you to tap lightly on the pad surface to click. Experiment - you might discover additional functionality to your laptop you didn't know you had.

8

Use the trackpad's right click button as the secondary mouse button. You'll do anything involving a "contextual menu" or a "right click" by just pressing the right click button located at bottom right of the trackpad.

9

Locate your laptop's optical drive, if any. If your laptop is not a 'netbook' it probably has an optical drive which you can use to install software or play music. The optical drive is usually located on the right or left side of the laptop.In Windows and Mac OS, you can open the optical drive by pushing the small button on it, or by right-clicking the optical drive icon in your operating system and selecting "Eject".

How to on a computer

How to turn on a computer

Turning on your computer isn’t always easy. Some manufacturers hide the ‘on’ button – for instance, on top of the case or flat on the front where you can’t see it. When you get your computer, don’t be embarrassed to ask: ‘Where’s the “on” button?’

Follow these step-by-step instructions to help you turn on your computer


Step 1: Find the ‘on’ button. It probably looks like this (but might be square or oblong!):


How to turn on a computer

Turning on your computer isn’t always easy. Some manufacturers hide the ‘on’ button – for instance, on top of the case or flat on the front where you can’t see it. When you get your computer, don’t be embarrassed to ask: ‘Where’s the “on” button?’

Follow these step-by-step instructions to help you turn on your computer


Step 1: Find the ‘on’ button. It probably looks like this (but might be square or oblong!):


Step 2: Push the button.


On some computers, the button lights up when the computer is on. On laptops, there’s often a light on the front that comes on. You may have to keep pushing for a couple of seconds to make this happen, but don’t worry – you’ll soon get to know how your computer works.


If nothing happens, there are a few things you can check easily:


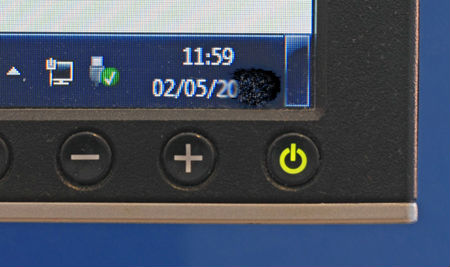
If you’re using a laptop, the battery might be flat. So plug in the charger, plug the charger into the mains and let the laptop recharge. You can continue to use it while it’s doing this.If you have a PC, make sure that the plug or any of the other wires haven’t become disconnected.Ensure that the monitor is turned on. Most PC monitors have an ‘on/off’ button on the bottom corner of the screen (see below). The button often lights up green when the monitor is on.
 

Step 3: Now you need to log in.


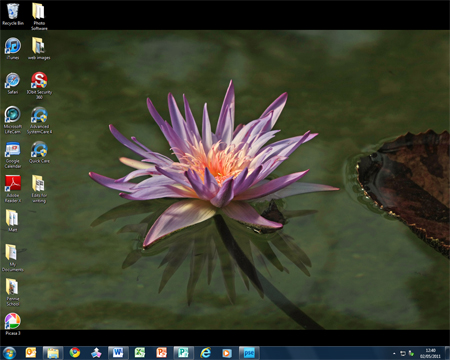
If you’re the only user of your computer, once it’s turned on it may go straight to the desktop:


If you’re using a public computer – for example, in a library – you’ll be given instructions (and help if you ask for it) on how to log in.


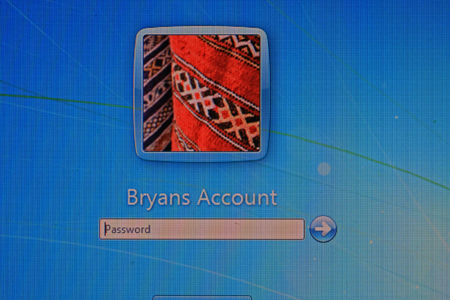
If you’re sharing your computer with other people, each one will usually have their own account. When you turn on the computer, the screen will look something like this:



When you click the icon above your name, you’ll be asked for a password. The main user or administrator should set this up for you before you begin. Type in your password and click the arrow.


Step 2: Push the button.


On some computers, the button lights up when the computer is on. On laptops, there’s often a light on the front that comes on. You may have to keep pushing for a couple of seconds to make this happen, but don’t worry – you’ll soon get to know how your computer works.


If nothing happens, there are a few things you can check easily:


If you’re using a laptop, the battery might be flat. So plug in the charger, plug the charger into the mains and let the laptop recharge. You can continue to use it while it’s doing this.If you have a PC, make sure that the plug or any of the other wires haven’t become disconnected.Ensure that the monitor is turned on. Most PC monitors have an ‘on/off’ button on the bottom corner of the screen (see below). The button often lights up green when the monitor is on.


Step 3: Now you need to log in.


If you’re the only user of your computer, once it’s turned on it may go straight to the desktop:


If you’re using a public computer – for example, in a library – you’ll be given instructions (and help if you ask for it) on how to log in.


If you’re sharing your computer with other people, each one will usually have their own account. When you turn on the computer, the screen will look something like this:


When you click the icon above your name, you’ll be asked for a password. The main user or administrator should set this up for you before you begin. Type in your password and click the arrow.